I am often asked if people in the medieval period knew that some of the pigments they were making were hazardous to their health. They were making and using pigments with mercury, arsenic, and lead. My answer is that of course they did. They may not have understood exactly how or why the pigment was hazardous, but they did know what happened to some people who worked with these pigments and knew to take as much precaution as possible.
Even during the Roman Empire people knew that some substances were hazardous and took precautions when working with them. In Pliny the Elder’s Natural History, Pliny describes the precautions workers took when polishing cinnabar. Face masks made of bladder-skin were used to prevent the workers from inhaling the mercury sulphide dust created from their work.
Vermillion paint
Cennini lists orpiment and realgar as toxic pigments. Orpiment is composed of 60 percent arsenic and realgar is 70 percent arsenic. Toxicity is all in exposure however, and Cennini says that orpiment is used to treat mites in hawks. While the chapter on realgar does not have any safety tips, the chapter on orpiment warns the reader not to allow orpiment to spatter into your mouth because of the toxicity. Lara Broecke theorizes that Cennini’s instructions to keep pigments under water are to keep fine toxic pigment particles from entering the artist’s lungs.
Multiple papers and websites tell of Leonardo da Vinci using a wet cloth face covering to protect his lungs from hazardous chemicals or dust, but I was unable to find a direct source.
We know so much more about the safety of historical pigments now. We have N95 masks and respirators, fume hoods, and gloves. We also have safe modern alternatives to poisonous pigment. If you choose to work with historical pigments, please use modern safety equipment and stay as safe as possible!
Use all available safety equipment!
Sources:
Broecke, Lara. Il Libro dell’ Arte. Archetype Publications, 2016. Pg. 94.
Pliny the Elder. Natural History: A Selection. Penguin Classics, 2004. Pg. 304.
I was given turnsole seeds in 2019 and didn’t get a chance to plant them until this year. I was not sure that any would grow. I tried a few things before putting the seeds in the ground. One third of the seeds were soaked in water before planting, one third were soaked and the seed coats nicked, and the last third were left alone and planted without nicking or soaking. Half of each group was planted in a pot and the other half were planted in a flower bed in the same area. I watered the seeds after planting them and watered them each day for several weeks.
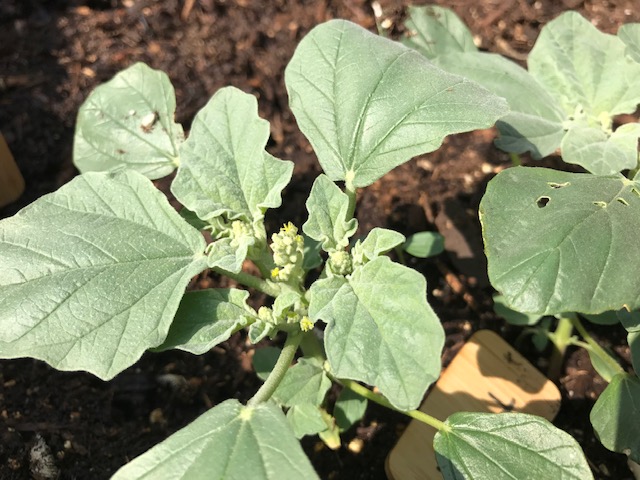
While the other seeds I planted around the same time sprouted (morning glory, zinnia, sunflower, cosmos), the turnsole did not, so I stopped watering them. That’s when I was greeted with a surprise. After several weeks of not watering the seeds, I found two sprouts! The plants kept growing and flower buds began to form. Soon little yellow flowers bloomed and the telltale tri-lobed seed pods began to form.
Baby turnsole plants
Growing turnsole plants
Flower buds
I am still waiting for the pods to ripen and collect both the seeds and the pods. The seeds I will plant in the spring, although I may leave a few in the pot to see how they do with some cold during the winter. The seedpods I will soak to extract the red color. Hopefully I will have more plants next summer and will be able to pick some pods before they fully ripen to extract a blue or purple color.
As the seed pods form, they begin to droop.
Swelling seed pod
Recipe from De Arte Illuminandi (Pages 5-6) to make clothlets with turnsole:
It is made also in another way from the plant called turnsole, and it stays blue in color for a year; afterwards it turns into a violet color. Now this is the way to make the color from this plant. Take the seeds of this plant, which are gathered from the middle of July up to the middle of September. And it has yellow <…> and its fruits, that is, those seeds, are triangular. That is because there are three seeds joined in one. And they should be gathered when the weather is fair. And the seeds are to be freed from the stems from which they hang, and put into an old, clean, linen or hempen cloth. And fold up the cloth, and draw it through your hands, until the cloth is saturated with the juice; and the kernels of the seeds do not get broken. And have a glazed porringer and squeeze the juice out of this cloth into this porringer; and again take some more fresh seeds of the plant and extract the juice in the same way, until you have enough of it. Then take some other good clean linen cloths which have been wet down first once or twice in a lye made with water and quicklime; and then wash them very thoroughly with clear water and dry them. (They can even be prepared plain, without <using> the lime.) And when they are dry, put them into this porringer where the juice of the aforesaid plant is; and let the cloths soak up enough of this juice to saturate them thoroughly. And let them stand in this porringer for one day or a night. Then have a dark, moist place, where you may put some garden loam in a winecup or other suitable dish, or upon screens, where neither wind, sun, rain nor water may get at it; and let there be voided upon this loam a quantity of the urine of a healthy man who has been drinking wine. And over it, furthermore, you upt up a structure of light reeds or other little wooden rods, so that the cloths soaked in this liquid may be spread out above the vapor of the urine, <but> in such a way as not to touch the wine-soaked earth described above, because they would be spoiled. And then let them stay this way for three or four days, or until they dry there. Then put these cloths under books and keep them in a box; or put them into a glass jar, close it up, put it in quicklime, not slaked, in a quiet, dry spot, and keep it.
It’s about time for me to make a few more lake pigments to bulk up my stash. I chose some of the ones I haven’t made in a while: buckthorn, weld, and lac. All are medieval illumination pigments. Buckthorn is a berry and makes an orangish yellow color. Weld’s yellow leans toward the green hues and is from the dried stem of the plant. Lac is a lovely purplish red and is an insect resin.
Each dyestuff was put into a jar with 1 teaspoon of potash and 1 cup of water. I used 1/4 cup of dye stuff for the buckthorn and weld and since the lac is ground really fine and I didn’t have a lot of it, I used 1/8 cup of dyestuff. Tomorrow I will strain the plant bits/insect resin bits out of the dyed water, combine it with a calcium carbonate (chalk) and alum, and let it dry out.
Basic recipe for lake pigment:
1 tsp potash
1 cup water
1/4 cup dyestuff
1 tsp calcium carbonate
1 tsp alum
Combine potash, water, and dyestuff in a jar, shaking once in a while to mix. Allow to sit overnight. Strain out dyestuff using a cloth (linen or flour sack towel). Put dyed liquid in a non-reactive pot. Heat to not quite boiling. Add alum and calcium carbonate, stirring briskly. Pour into an unglazed clay pot saucer. Allow to dry. Scrape out of the saucer and grind on a glass slab with a muller and a little water. Allow to dry in little cakes or dry and put powder into a small jar.
When you make carbon black pigments, all kind of interesting things happen. The material turns black all the way through in an oxygen devoid container. The sound they make when they hit each other and the sides of a container changes into an almost porcelain “tink”. The other change is that as almost everything besides carbon burns away, the material shrinks by quite a bit.
Almond shells: before and after carbonization
Carbon black pigments are one of my favorite to make because they involve sitting by a campfire for a while and just sitting and relaxing for most of the time. They are very easy and pretty quick to make. To see more that I’ve written on carbon black pigments, check this out. For ivory black here. For peach pit black here.
I use a pipe fitting with two end caps in a fire to make carbon black pigments.
On November 7 I taught a class on what medieval pigments were used, when they were used, how they were made, and where the materials came from. I finally uploaded the video which you can access here .
Many medieval and renaissance pigment manuscripts have a recipe for making a blue verdigris-like pigment using silver. For example, we have this recipe from Mappae Clavicula:
ii. Azure
If you wish to make the best azure, take a new pot that has never been used for any work and set in it sheets of the purest silver, as many as you want, and then cover the pot and seal it. Set the pot in the must that is discarded from a wine-press, and there cover it well with the must and keep it well for 15 days. Then uncover the pot and shake the efflorescence that surrounds the sheets of silver into a shining bowl. If you want to have more, repeat what has been written above.v
Smith, C., & Hawthorne, J. (1974). Mappae Clavicula: A Little Key to the World of Medieval Techniques. Transactions of the American Philosophical Society,64(4), 1-128. doi:10.2307/1006317
Or this from the Manuscripts of Jehan le Begue:
169. How azure is made.
If you wish to make azure, take a new jar that has never been used, and put into it strips of very pure silver, as many as you like, and so cover it up, and seal it, and put the jar among the grape-skins, and keep it well for 1 days and then open the jar, and scrape into a very clean vase the efflorescence which you find on the silver, which will be a perfect azure, and of a blue colour, provided that the silver contains no alloy or mixture of any other metal, but only consists of the purest and finest silver. If it contains any brass, you will obtain a colour which is rather green, than blue or azure. If you afterwards want any more of it, do again as directed.
Merrifield, M. P., & Alexander, S. M. (1967). Original treatises on the arts of painting. New York: Dover.
We can file these recipes under the category “Impossible”. While silver may contain come copper impurities that would turn a slight blue, pure silver will not turn blue. When silver tarnishes, it turns black as evidenced by silver leaf and shell silver that has turned black on medieval scrolls.
Because I am curious, I decided to run my own experiment. I had three small jars: one with copper, one with brass, and one with silver. In each jar I added some vinegar in addition to the metal strips. I closed the jars and left them for about six months. The results are as expected. The copper and the copper containing brass both developed a blue efflorescence, more on the copper than silver. The silver had a very faint blue tinge on a few droplets of vinegar that formed on the silver, but nothing of note formed on the silver. Azure from silver? Mission impossible!
Efflorescence developed most on the copper, some on the brass, and none on the silver as expected.
For a scientific paper on the same subject which found that the blue formed was a copper acetate see: Orna, M., Manfred J. D. Low, & Julian, M. (1985). Synthetic Blue Pigments: Ninth to Sixteenth Centuries. II. ‘Silver Blue’. Studies in Conservation,30(4), 155-160. doi:10.2307/1506036
My adventures in silverpoint drawing led me to trying my hand at making colored drawing papers as described in Cennino Cennini’s 15th Century Italian art manual, Il Libro dell’ Arte. Cennini lists six colored paper recipes. He notes that these can be used on either paper or parchment. I had all the pigments I would need. Once I had procured some bone ash I was ready to go.
Bone Ash
Bone ash is often translated as calcined bone in medieval painting recipes. I use the term bone ash here since if you are looking to order some, that’s what Natural Pigments has it listed as and I think it gives a better visual picture than calcined bone. I have tried making my own bone ash using Cennini’s instructions. Cennini instructs the reader to take the wing and thigh bones of a chicken or capon and throw them into a fire until they are whiter than ash. You then remove them from the fire and grind them until fine.
The Manuscripts of Jehan Le Begue in Experimenta De Coloribus contains a very similar recipe (Merrifield pg 62-63). Alcherius De Coloribus Diversis in the Manuscripts of Jehan Le Begue (Merrifield 274-279) allows any animal bone or stag’s horn to be used, although stag’s horn in best prized. Alcherius instructs the artist to burn the horn or bone to make it white, then boil it, and grind it. The ground bone is then dried on a clay or chalk brick and then put into a crucible and burned again before a final grinding. Alcherius also mentions that this bone ash when mixed with parchment glue and with pigments optional and can be added to wooden panels, cloth, parchment, or paper.
Following Cennini’s instructions the best I have achieved is a dark grey. I have not succeeded in getting the bones white enough to make a good ash. Since I have not produced a good, white ash, I purchased my bone ash from Natural Pigments.
Bone ash and the required pigments for the flesh color recipe
The Glue
The bone ash is mixed with glue to attach to the paper. Cennini recommends a glue made from the muzzle, skin, and hooves of a kid. Alcherius mentions glue or size from clippings of white leather or parchment. Since I had no kid glue, I used commercial Rublev brand hide glue granules purchased from Natural Pigments. I was not sure how much granules to use with how much water. I estimated 1 tablespoon of granules in 2 cups of water. I allowed the granules to sit in the water in a small pot for a while before heating it. This seemed to have worked okay, but the grounds seemed a bit soft and even when the grounds were applied in only a layer or two, they allowed the silverpoint to sink into the grounds making white spots. For the second batch of grounds, I added another tablespoon of hide glue granules to the glue batch for a total of 2 tablespoons. This was a much thicker glue, but did not impact spreadability. The second batch of grounds appears to be about the right consistency with the thicker glue. Cennini suggested to apply the grounds in 3 to 5 layers, but one or two seemed to work best.
Drawing on murrey grounds. The grounds are either too thick or I did not make the glue strong enough and the stylus dug into the grounds at points making white streaks.
Measurements
The next issue I came across was the measurements. Cennini mentions four measurements in the recipes for colored papers: ounce, a “bit”, a walnut shell, and a bean. I wanted an easily measurable equivalency for measuring out the pigments so I figured a teaspoon was very close to the capacity of a walnut shell and an eighth of a teaspoon measure was close to the size of a bean. The Strasbourg Manuscript, a fifteenth century German artist manuscript, also uses a bean as a measurement. Broecke notes in her translation (note 9, page 27) that a bean could have meant a fava bean, but that there were beans of several types and sizes at that time so a bean was not a very standard measure. For an ounce, Broecke notes that in Padua and Florence where Cennini lived an ounce was approximately 28 grams. I measured my pigments on a scale and found that 7 grams was approximately 2 teaspoons. My ounce may be dramatically off as evidenced by some of the colors this measurement system resulted in, especially the reddish color. A “bit” as used in Cennini’s recipe was listed as about half an ounce so that’s about what I used.
Safety
I made a few substitutions in the pigments for safety. I live in a household with two young children and three very friendly cats, so I substituted titanium white for lead white. This may have impacted the recipes some, but the safety risks outweighed any worries I had in the result. I also used artificial vermillion instead of mercury containing true vermillion for the same safety concerns. As the amount of vermillion used was quite small, I have less concerns that this impacted the result. I used commercially obtained pigments for most of the pigments since I do not have a readily available source of green earth, hematite, sinopia, or indigo. The one pigment that I created myself was the black. Cennini only says to use black, so I used a charcoal black made from hardwood charcoal.
The reason I didn’t use lead white or true vermillion
Now on to the color recipes!
Colored grounds with a silverpoint line along the right side
Chapter 16: Green
Being the first recipe for a colored paper preparation, Cennini gives the most detail to this recipe. He details how to prepare the glue to add into the pigments. Cennini instructs the artist to apply the grounds with a soft brush in one direction and then the other. The grounds are to be applied in layers, allowing time to dry between each layer. This recipe calls for bone ash, although many don’t. Chapter 22 revises the recipes that don’t call for bone ash and instructs the reader to add at least a bean of bone ash to each recipe.
The pigments for green:
1/2 walnutshell of green earth
bit (half of green earth) ochre
1/2 amount of lead white as ochre
bean of bone ash
1/2 bean vermillion
The pigments for green: green earth, ochre, lead white, bone ash, and vermillion
This recipe resulted in a color more brown than green. The grounds have a slight green tint and the color was much more brown before drying on the paper. For the green I used Verona Green Earth and for ochre Italian Yellow Earth, both from Rublev. Titanium White from Rublev substituted for lead white. The vermillion is a safer artificial vermillion color from the Limner’s Guild.
Green?
Chapter 18: Murrey or Maroon
The pigments for murrey or maroon:
1/2 ounce of lead white
1 bean iron ore (hematite)
The color turned out to be a nice pink, slightly on the more purple side. I used Armenian Hematite and substituted Titanium White for lead white, both from Rublev. I made a half recipe of this one and added in half a bean of bone ash.
Murrey or maroon grounds
Chapter 19: Indigo
The pigments for indigo:
1/2 ounce lead white
2 beans Bagdad indigo
This resulted in a pretty, light denim color. I substituted Titanium White from Rublev for lead white and used ground indigo from Griffin Dyeworks. Bagdad indigo in medieval manuscripts refers to “true” indigo, Indigofera tinctoria, as opposed to woad which was also referred to as indigo. True indigo was labeled as Bagdad indigo because much of the indigo was traded through Bagdad. I halved this recipe and added half a bean of bone ash.
Indigo grounds
Chapter 20: Reddish or peach
The pigments for reddish or peach:
1/2 ounce green earth
2 beans of coarse white lead
1 bean of light sinopia
This recipe did not turn out at all how the chapter title would have you expect. With a large amount of green pigment, the color is expectedly greenish instead of reddish. I halved this recipe as well and added a half bean of bone ash.
The “reddish” color is decidedly green
Chapter 21: Flesh Color
The pigments for flesh color:
1/2 ounce of coarse white lead
less than 1 bean vermillion
Pigments used to make the flesh color
This turned into a light, slightly orange pink. I again halved the recipe to keep from making too much pigment and added half a bean of bone ash.
Chapter 22: Tawny or dun
The pigments for tawny or dun:
1/4 ounce coarse lead white
1 bean light ochre
less than 1/2 a bean black
This color turned out to be a very light slightly brownish color. It was hard to see that there was color unless against the background of the paper or in the correct light.
Tawny or dun color
In all, I think that I’ve worked out some kinks in making the grounds the right consistency and seem to have something I can draw on now. I would like to try the grounds on parchment and wood as well as paper. I may also try applying the grounds to different papers since I know that bristol board isn’t medieval.
Here’s a link to my class handout for the Trade in Medieval Pigments class that I taught this weekend at Known World Heraldic and Scribal Symposium. I will post a link to the video recording as soon as it is available.
My reading lately has been on the trade in pigments during the medieval/renaissance periods. One of the interesting things I have found is the development of specialized purveyors of artists’ pigments. In earlier periods the people who sold pigments to artists seemed to be largely more general merchants and apothecaries who carried spices and other things besides pigments. Later in period, the dealers in artists materials specialized, especially in larger cities with many artists in residence.
Pigments, gold leaf, and other artists materials in fourteenth and fifteenth century Dijon in Burgundy were sold by general merchants or a slightly more specialized merchant, the espicier or spice merchant. Other people who were documented to have sold pigments at this time and place include a priest, a drapier (cloth merchant), an appothecaire (apothecary), an orbatteur (gold beater), and a goldsmith.
In Florence during the Renaissance, artist materials were purveyed by the speziali, apothecaries who sold not only medicinal supplies, but also artist materials.
In contrast, in Antwerp in the sixteenth century, the specialized art material dealers were called verfvercopere (seller of paint) or marchand de couleurs (merchant in colors) and often registered with the Guild of Saint Luke, which included artists and art dealers. These art material dealers would either sell from a shop in their home or in a stall in a market called a pand.
Venice was another hot spot for artists and for trade and spawned the creation of vendecolori. The vendecolori seemed to have not only sold pigments to artists, but participated in all parts of the trade in pigments: as wholesalers, exporters, importers, and perhaps even making or refining pigments.
Sources:
Matthew, Louisa and Barbara Berrie. ‘Memoria de colori che bisognino torre a vinetia’: Venice as a Centre for the Purchase of Painters’ Colours. Trade in Artists’ Materials. Markets and Commerce in Europe to 1700. eds Jo Kirby, Susie Nash, and Joanna Cannon, 245-252. Archetype Publications, London. https://www.academia.edu/41562531/Memoria_de_colori_che_bisognono_torre_a_vinetia..
I’ve fallen down a deep rabbit hole lately. I found a wealth of papers on a subject I’ve been trying to find information on for a while. I find it fascinating to discover where pigments were created and how they traveled from where they were created to where they were used. A really interesting read is this paper: ‘Memoria de colori che bisognino torre a vinetia’: Venice as a Centre for the Purchase of Painters’ Colours by Louisa Matthew and Barbara Berrie. The paper deals with the vendecolori or pigment merchants of Venice. These were apothecaries who came to specialize in the import, export, wholesale, and retail of colorants used in painting, dying, ceramics, and more.
Venice sat at a nexus for international trade during the medieval period. Land routes would bring materials like azurite from Germany and sea routes would bring materials from all over the world like smalt from Flanders, brazilwood and gum Arabic from the East. These materials would be resold, refined, or turned into ready to use pigment in Venice and then sold to artists throughout Europe.
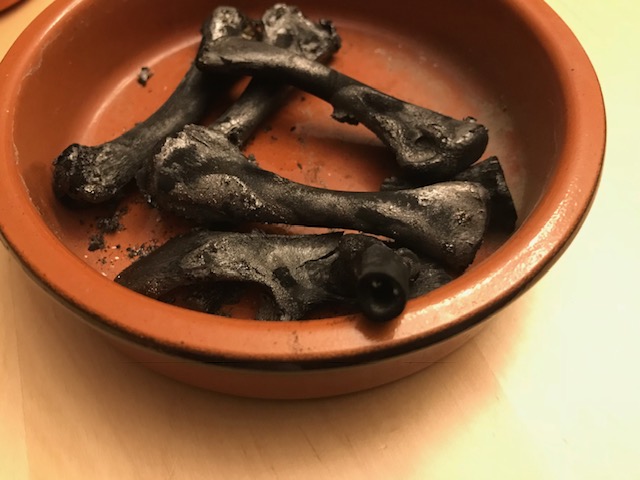
One of the things that caught my attention was that one of the pigments traded was bone black. This is one of the pigments that I have made. Bones would be available all over Europe as waste from meals. The pigment is obtained by placing the bones into a low oxygen container such as a casserole dish sealed with clay and then charred in an oven such as a baker’s oven overnight. The process was rather easy and the material was free so why buy a pigment that the artist could make themselves? Perhaps it was that time was valuable and the artist would not want to make the pigment and then grind it. Perhaps it was because someone had built a large facility to make such pigments and could make them more quickly and easily.
Charred chicken bones that will be ground to make bone black pigment
A similar question was brought up in the paper regarding lead white . Lead white was something that could be made anywhere in Europe, so why trade in it? A mention is made that the lead white created in Venice was considered of a better quality than created elsewhere leading the reader to ask what was so special about the Venetian lead white.
Overall, I found the paper fascinating and look forward to looking at the sources and notes in the paper to learn more.