I am often asked if people in the medieval period knew that some of the pigments they were making were hazardous to their health. They were making and using pigments with mercury, arsenic, and lead. My answer is that of course they did. They may not have understood exactly how or why the pigment was hazardous, but they did know what happened to some people who worked with these pigments and knew to take as much precaution as possible.
Even during the Roman Empire people knew that some substances were hazardous and took precautions when working with them. In Pliny the Elder’s Natural History, Pliny describes the precautions workers took when polishing cinnabar. Face masks made of bladder-skin were used to prevent the workers from inhaling the mercury sulphide dust created from their work.
Vermillion paint
Cennini lists orpiment and realgar as toxic pigments. Orpiment is composed of 60 percent arsenic and realgar is 70 percent arsenic. Toxicity is all in exposure however, and Cennini says that orpiment is used to treat mites in hawks. While the chapter on realgar does not have any safety tips, the chapter on orpiment warns the reader not to allow orpiment to spatter into your mouth because of the toxicity. Lara Broecke theorizes that Cennini’s instructions to keep pigments under water are to keep fine toxic pigment particles from entering the artist’s lungs.
Multiple papers and websites tell of Leonardo da Vinci using a wet cloth face covering to protect his lungs from hazardous chemicals or dust, but I was unable to find a direct source.
We know so much more about the safety of historical pigments now. We have N95 masks and respirators, fume hoods, and gloves. We also have safe modern alternatives to poisonous pigment. If you choose to work with historical pigments, please use modern safety equipment and stay as safe as possible!
Use all available safety equipment!
Sources:
Broecke, Lara. Il Libro dell’ Arte. Archetype Publications, 2016. Pg. 94.
Pliny the Elder. Natural History: A Selection. Penguin Classics, 2004. Pg. 304.
The quickest way to prepare a wood panel for drawing with silverpoint in Cennini’s Il Libro dell’ Arte is with saliva and bone ash. Cennini says:
First, get a box wood tablet measuring a sommesso along each side completely smooth and clean (that is, washed with clear water, rubbed down and smoothed with the kind of cuttlefish which goldsmiths use for casting). And when this tablet is completely dry, take as much bone that has been mulled thoroughly for two hours as you need (and the finer the better), then gather it up, take it and keep it dry, folded into a piece of paper. And when you need it for priming the tablet, take less than half a bean’s worth of this bone, or less, and stir the bone together with saliva. Start distributing it over the whole tablet with your fingers and, before it dries, take the tablet in your left hand and pat the surface of the tablet with the fingertips of your right hand until you see that it is completely dry; and it becomes evenly coated in bone, in one part as in another.
Cennino Cennini’s Il Libro Dell’arte: a New English Language Translation and Commentary with Italian Transcritpion, by Lara Broecke, Archetype Publ., 2015, p. 27.
This seems to be a quick and easy drawing method to do a quick practice, not to make a work of art that would be kept as long.
I bought some small pieces of wood, 5″ square pieces of poplar plywood, to try this out. I started by trying to wash and smooth my piece of wood. I was not surprised to see that the poplar plywood did not respond well to being wetted and rubbed with cuttlefish bone that I had ground as fine as possible. The poplar was already rather smooth before I tried to further smooth it and the cuttlefish bone powder just raised the grain of the wood and did not make it any smoother.
With a fresh piece of wood (I had bought 50 for $18 with plans of being able to use them for classes when we are able to see each other in person when the pandemic eases), I decided to try preparing my panel with saliva and bone ash. I used commercial bone ash bought from Natural Pigments. It’s a very nice, finely ground bone ash. I put about 1/8 of a teaspoon (my approximation of half a bean worth) of bone ash onto the panel and tried with as much dignity to spit onto the piece of wood.
If you have never spit on a small piece of wood with a pile of fine bone ash on it, you will be unprepared, as I was for the results. When I spit onto the panel the bone ash scattered mostly everywhere but the panel. My shirt, pants, and the floor got a good scattering of bone ash. I highly suggest adding the saliva to the panel before you put your bone ash on it. Lesson learned.
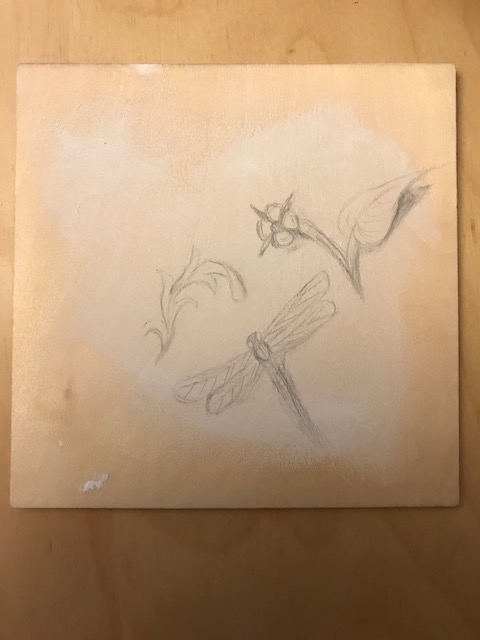
Panel prepared with saliva and commercial bone ash
Next I mixed the bone ash and saliva with my finger and, as best as I could, spread the paste over the wood panel. It was not spread over the complete panel, but I had a big enough area to see if the method would work. I allowed the panel to dry before trying to draw on it.
Dry panel with drawings
I was surprised how well the panel worked. I was concerned that my panel was not quite smooth enough and the bone ash would collect in the grain of the panel. The panel was surprisingly even, yet had the required tooth for the silverpoint to mark. Even areas that did not get a really good coating on bone ash marked under the silverpoint. I was able to get a good gradient of light and dark marks when varying pressure and the running over the same area several times. The bone ash did come up just a bit and I swept away or blew away a little bone ash, but it was not enough to affect the drawing or to make a mess.
Overall, this is a quick and easy way to practice metalpoint drawing. No glue to be hydrated or heated. No pigments to add. No water needed. This would be a very portable way to practice drawing.
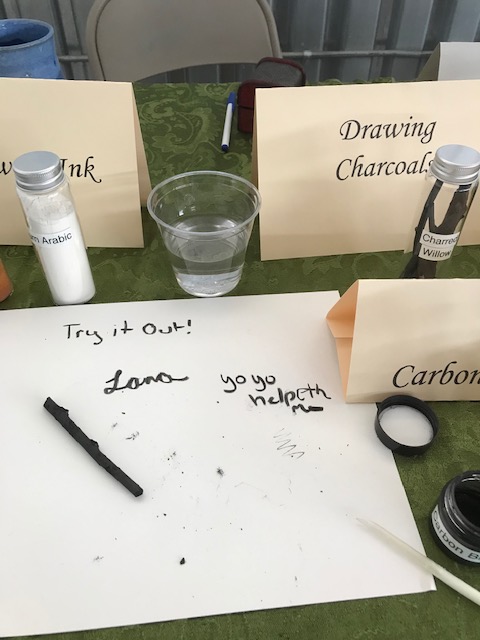
I’ve made drawing charcoals before. If you are interested in the documentation and process, check out this blog post. I recently decided to try some more charcoals with the willow sticks I had as well as some basswood sticks. The basswood sticks were thicker than my willow sticks. Both sticks were very dry. Before charring them, I used an x-acto knife to sharpen each stick to a point. In past batches I haven’t sharpened them and found that they were more likely to break if I tried to sharpen the sticks after charring. I then put the sticks into pipe fittings with end caps and put them into a fire for a while. The fire was nice and hot and the larger pipe fitting was actually glowing orange when I moved it to the edge of the fire pit to try to cool it a bit before pulling it from the fire pit with welding gloves.
After allowing the charcoals to cool, I tried them out. No matter the thickness of willow charcoals I have made, they are always a really soft and very dark black. The basswood sticks were much harder and slightly less black. I doubt that the different in color is due to the thickness of the charcoal because I have made willow charcoals just as thick as this batch of basswood, but never experienced such a hard charcoal. I enjoyed seeing the difference that tree species made in charcoals. I can see why Cennini recommended willow for charcoals.
My adventures in silverpoint drawing led me to trying my hand at making colored drawing papers as described in Cennino Cennini’s 15th Century Italian art manual, Il Libro dell’ Arte. Cennini lists six colored paper recipes. He notes that these can be used on either paper or parchment. I had all the pigments I would need. Once I had procured some bone ash I was ready to go.
Bone Ash
Bone ash is often translated as calcined bone in medieval painting recipes. I use the term bone ash here since if you are looking to order some, that’s what Natural Pigments has it listed as and I think it gives a better visual picture than calcined bone. I have tried making my own bone ash using Cennini’s instructions. Cennini instructs the reader to take the wing and thigh bones of a chicken or capon and throw them into a fire until they are whiter than ash. You then remove them from the fire and grind them until fine.
The Manuscripts of Jehan Le Begue in Experimenta De Coloribus contains a very similar recipe (Merrifield pg 62-63). Alcherius De Coloribus Diversis in the Manuscripts of Jehan Le Begue (Merrifield 274-279) allows any animal bone or stag’s horn to be used, although stag’s horn in best prized. Alcherius instructs the artist to burn the horn or bone to make it white, then boil it, and grind it. The ground bone is then dried on a clay or chalk brick and then put into a crucible and burned again before a final grinding. Alcherius also mentions that this bone ash when mixed with parchment glue and with pigments optional and can be added to wooden panels, cloth, parchment, or paper.
Following Cennini’s instructions the best I have achieved is a dark grey. I have not succeeded in getting the bones white enough to make a good ash. Since I have not produced a good, white ash, I purchased my bone ash from Natural Pigments.
Bone ash and the required pigments for the flesh color recipe
The Glue
The bone ash is mixed with glue to attach to the paper. Cennini recommends a glue made from the muzzle, skin, and hooves of a kid. Alcherius mentions glue or size from clippings of white leather or parchment. Since I had no kid glue, I used commercial Rublev brand hide glue granules purchased from Natural Pigments. I was not sure how much granules to use with how much water. I estimated 1 tablespoon of granules in 2 cups of water. I allowed the granules to sit in the water in a small pot for a while before heating it. This seemed to have worked okay, but the grounds seemed a bit soft and even when the grounds were applied in only a layer or two, they allowed the silverpoint to sink into the grounds making white spots. For the second batch of grounds, I added another tablespoon of hide glue granules to the glue batch for a total of 2 tablespoons. This was a much thicker glue, but did not impact spreadability. The second batch of grounds appears to be about the right consistency with the thicker glue. Cennini suggested to apply the grounds in 3 to 5 layers, but one or two seemed to work best.
Drawing on murrey grounds. The grounds are either too thick or I did not make the glue strong enough and the stylus dug into the grounds at points making white streaks.
Measurements
The next issue I came across was the measurements. Cennini mentions four measurements in the recipes for colored papers: ounce, a “bit”, a walnut shell, and a bean. I wanted an easily measurable equivalency for measuring out the pigments so I figured a teaspoon was very close to the capacity of a walnut shell and an eighth of a teaspoon measure was close to the size of a bean. The Strasbourg Manuscript, a fifteenth century German artist manuscript, also uses a bean as a measurement. Broecke notes in her translation (note 9, page 27) that a bean could have meant a fava bean, but that there were beans of several types and sizes at that time so a bean was not a very standard measure. For an ounce, Broecke notes that in Padua and Florence where Cennini lived an ounce was approximately 28 grams. I measured my pigments on a scale and found that 7 grams was approximately 2 teaspoons. My ounce may be dramatically off as evidenced by some of the colors this measurement system resulted in, especially the reddish color. A “bit” as used in Cennini’s recipe was listed as about half an ounce so that’s about what I used.
Safety
I made a few substitutions in the pigments for safety. I live in a household with two young children and three very friendly cats, so I substituted titanium white for lead white. This may have impacted the recipes some, but the safety risks outweighed any worries I had in the result. I also used artificial vermillion instead of mercury containing true vermillion for the same safety concerns. As the amount of vermillion used was quite small, I have less concerns that this impacted the result. I used commercially obtained pigments for most of the pigments since I do not have a readily available source of green earth, hematite, sinopia, or indigo. The one pigment that I created myself was the black. Cennini only says to use black, so I used a charcoal black made from hardwood charcoal.
The reason I didn’t use lead white or true vermillion
Now on to the color recipes!
Colored grounds with a silverpoint line along the right side
Chapter 16: Green
Being the first recipe for a colored paper preparation, Cennini gives the most detail to this recipe. He details how to prepare the glue to add into the pigments. Cennini instructs the artist to apply the grounds with a soft brush in one direction and then the other. The grounds are to be applied in layers, allowing time to dry between each layer. This recipe calls for bone ash, although many don’t. Chapter 22 revises the recipes that don’t call for bone ash and instructs the reader to add at least a bean of bone ash to each recipe.
The pigments for green:
1/2 walnutshell of green earth
bit (half of green earth) ochre
1/2 amount of lead white as ochre
bean of bone ash
1/2 bean vermillion
The pigments for green: green earth, ochre, lead white, bone ash, and vermillion
This recipe resulted in a color more brown than green. The grounds have a slight green tint and the color was much more brown before drying on the paper. For the green I used Verona Green Earth and for ochre Italian Yellow Earth, both from Rublev. Titanium White from Rublev substituted for lead white. The vermillion is a safer artificial vermillion color from the Limner’s Guild.
Green?
Chapter 18: Murrey or Maroon
The pigments for murrey or maroon:
1/2 ounce of lead white
1 bean iron ore (hematite)
The color turned out to be a nice pink, slightly on the more purple side. I used Armenian Hematite and substituted Titanium White for lead white, both from Rublev. I made a half recipe of this one and added in half a bean of bone ash.
Murrey or maroon grounds
Chapter 19: Indigo
The pigments for indigo:
1/2 ounce lead white
2 beans Bagdad indigo
This resulted in a pretty, light denim color. I substituted Titanium White from Rublev for lead white and used ground indigo from Griffin Dyeworks. Bagdad indigo in medieval manuscripts refers to “true” indigo, Indigofera tinctoria, as opposed to woad which was also referred to as indigo. True indigo was labeled as Bagdad indigo because much of the indigo was traded through Bagdad. I halved this recipe and added half a bean of bone ash.
Indigo grounds
Chapter 20: Reddish or peach
The pigments for reddish or peach:
1/2 ounce green earth
2 beans of coarse white lead
1 bean of light sinopia
This recipe did not turn out at all how the chapter title would have you expect. With a large amount of green pigment, the color is expectedly greenish instead of reddish. I halved this recipe as well and added a half bean of bone ash.
The “reddish” color is decidedly green
Chapter 21: Flesh Color
The pigments for flesh color:
1/2 ounce of coarse white lead
less than 1 bean vermillion
Pigments used to make the flesh color
This turned into a light, slightly orange pink. I again halved the recipe to keep from making too much pigment and added half a bean of bone ash.
Chapter 22: Tawny or dun
The pigments for tawny or dun:
1/4 ounce coarse lead white
1 bean light ochre
less than 1/2 a bean black
This color turned out to be a very light slightly brownish color. It was hard to see that there was color unless against the background of the paper or in the correct light.
Tawny or dun color
In all, I think that I’ve worked out some kinks in making the grounds the right consistency and seem to have something I can draw on now. I would like to try the grounds on parchment and wood as well as paper. I may also try applying the grounds to different papers since I know that bristol board isn’t medieval.
I picked up a copy of Lara Broecke’s translation of Cennino Cennini’s Il Libro dell’ Arte, a 15th Century Italian art manual. I had studied Thompson’s version for many years and was excited to see the Broecke’s new translation and all of the wonderful footnotes and endnotes as well as the original Italian. Both versions are worth picking up if you can. The older version is very affordable and available at many online booksellers. The newer version is significantly more expensive, but very comprehensive. My book purchase coincided with seeing a silverpoint set at Natural Pigments and quickly ordering it. Cennini spends quite a bit of time talking about how someone new to illumination should spend a year learning to draw first. He discusses silverpoint, lead stylus, ink drawing, colored ink washes, and what you can draw on.
New and older translations of Cennino Cennini’s Il Libro dell’ Arte
I started with the commercial silverpoint grounds that came in my kit. It was pretty easy to prepare (just add water and heat!) and brush onto some paper. Cennini mentions practicing drawing on paper, parchment, and wood boards. Since paper is cheap and readily available, I began with paper. I applied the commercial grounds to Strathmore Bristol Board that I regularly use for illumination. I had a few lumps in my first paper, but it didn’t seem like a big deal.
Silverpoint with commercial grounds on Strathmore Bristol Board using a commercial stylus
After the grounds were dry, I tried the silverpoint on the grounds. If you haven’t done silverpoint or another metalpoint drawing before, to draw you use a stylus with a metal wire inserted into the stylus. The metal abrades against the grounds on your surface leaving a mark. If you try to draw directly on paper, you won’t see a mark. Cennini mentions that the stylus can be silver or brass, but that the tip should be silver. I used a commercial stylus which is easy to change out the silver wire. It was much like using a pencil. The silver marked easily on the grounds and I was able to get easy shading by going over the lines again or by making crosshatching.
Silverpoint creature on commercial grounds
A while back I had purchased a lead stylus for drawing as well, but had never tried it. The advantage to using lead is that you can draw without preparing the paper with grounds. The disadvantage is that the stylus is 2 parts lead and one part tin. To negate any exposure to the lead, I wrapped the lead stylus in a piece of paper. The lead stylus did not make a mark quite as easily and was not quite as delicate of a line as the silver, but it did indeed mark the unprepared paper.
Lead stylus on unprepared Strathmore Bristol Board
Having sated my need to try new drawing styluses, I then moved to making my own colored grounds using Cennini’s instructions. That is a story for another post though.
I really enjoy making art materials from medieval artist manuals. My parents had taken down the big willow tree that was my favorite place to play as a child and asked me if I wanted any part of the tree. I asked for small willow twigs to make charcoals. I remembered that Cennini’s treatise had instructions on how to make the charcoals.
Cennini, Cennino The Craftsmans’ Handbook, pg. 19-20.
How to Make Good and Perfect and Slender Coals for Drawing
“Before going any farther, I want to show you in what fashion you should make the coals for drawing. Take a nice, dry, willow stick; and make some little slips of it the length of the palm of your hand, or, say, four fingers. Then divide these pieces like match sticks; and do them up like a bunch of matches. But first smooth them and sharpen them at each end, like spindles. Then tie them up in bunches this way, in three places to the bunch, that is, in the middle and at each end with a thin copper or iron wire. Then take a brand-new casserole, and put in enough of them to fill up the casserole. Then get a lid to cover it, <luting it> with clay, so that nothing can evaporate from it in any way. Then go to the baker’s in the evening, after he has stopped work, and put this casserole into the oven; and let it stay there until morning; and see whether these coals are well roasted, and good and black. If you find that they are not roasted enough, you must put the casserole back into the oven, for them to get roasted. How are you to tell whether they are all right? Take one of these coals and draw on some plain or tinted paper, or on a gessoed panel or ancona. And if you find that the charcoal takes, it is all right; and if it is roasted too much, it does not hold together in drawing, but breaks into many pieces. I will also give you another method for making these coals: take a little earthenware baking pan, covered as described above; put it under the fire in the evening, and cover this fire well with ashes; and go to bed. In the morning they will be roasted. And you may make big coals and little ones in the same way; and make them to suit yourself, for there are no better coals anywhere.”
My process
I took willow twigs and broke them into a length about the length of my palm that would fit into the pipe fitting with end caps that I have used in the past to make black pigments. The pipe fitting is a cheap, reusable low oxygen environment ideal for charring carbon based materials for pigment and charcoal. I did not use the clay container like the original recipe called for because of cost and because I was concerned that the container would break in the fire or would not last longer than one use. The pipe fitting with willow twigs in was in the fire for about 2 hours before I removed it from the fire and allowed it to cool. The twigs are fully charred and when tested worked well as drawing charcoals.
I should have sharpened the sticks before charring them, but forgot. I tried to sharpen them by trying to rub away the sharp corners. This seems to work a bit but the charcoal has a tendency to break pieces off. It may be easier to sharpen the charcoals before charring. Overall, they are a deliciously dark black charcoal and work great.
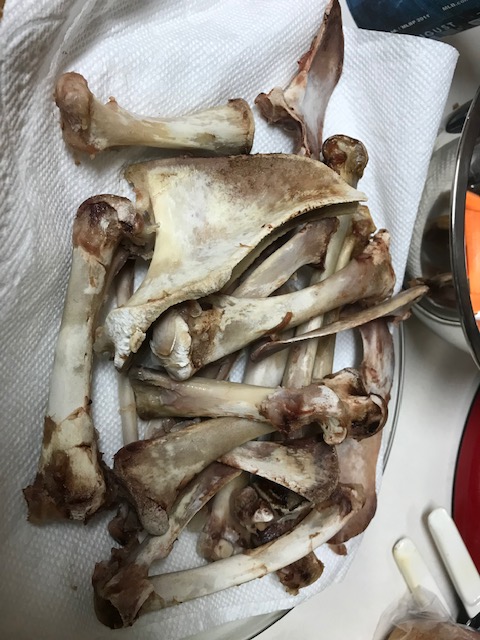
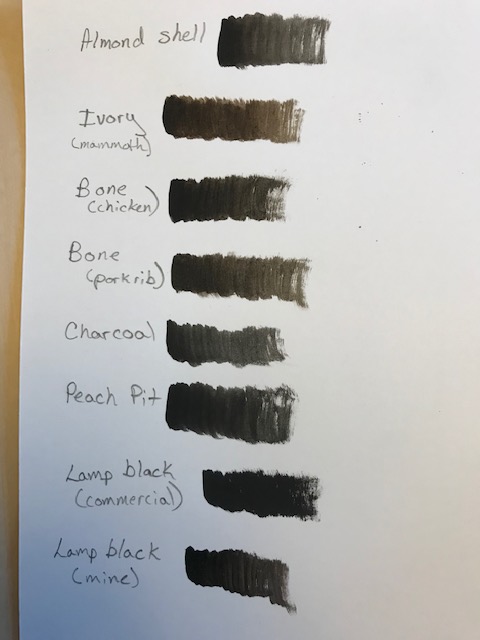
Recently I have been working on black pigments. I have already posted about peach pit black and bone and ivory blacks. I have added almond shell black and lamp black to the line up as well as tried bone black with pork rib bones which yielded some different results. Later I will try turkey bones to make bone black after our Christmas dinner.
Turkey bones left over from Christmas dinner will become bone black pigment at some time.
To make lamp black pigment, I filled a lamp with linseed oil from an art store. I then lit the lamp and positioned a heat resistant glass container above the flame and adjusted the flame to just lick the glass. I had to keep adjusting the flame to make sure it was in the correct position because the wick would burn down quickly. After a while, I turned off the flame and, when cool, removed the glass dish and scraped the soot with a palette knife. When making paint with the lamp black, I added a bit of ox gall because the oily soot resists water.
My lamp black making set up
Soot scraped from the glass
Lamp black pigment
Almond shell black as well as lamp black was mentioned in Ceninni’s Il Libro Del Arte. I made almond shell black the same way as bone black and ivory black, by putting the material into a closed container and putting it into the fire. The carbonized material was then ground.
Almond shellls with delicious nuts removed and eaten.
Pipe fitting with caps containing material to carbonize. This one had rib bone.
Carbonized almond shell
I also used rib bones from my husbands BBQ dinner to make bone black. The bones still had a significant amount of grease on them which caused flames to leak out of the pipe when carbonizing the bones.
Carbonized pork rib bones
All of this resulted in a variety of black pigments which I made into paint.
While the pigments looked identical to each other when ground, making them into paint brought out the differences in the black colors. Ivory black was significantly more brown than the other black pigments which sound like what I have read about historical ivory black paints. Bone black made with pork rib bones turned out very similar in a more dark brown than true black.
Almond shell black seemed a bit bluer than the rest of the pigments.
The darkest, truest black pigments were the bone black from chicken bones, charcoal that I had gathered from a campfire, peach pit, and lamp black.
*Fun little note: As I was working on black pigments, the song lyric “Black is color of my true love’s hair” kept running through my head, hence the blog post title.
I’ve been saving peach pits to make pigment, but burn bans had kept me from proceeding. Cennini in The Craftsman’s Handbook mentions peach pit black pigment, but gives no more information on how it was made. Cennini calls it “perfect, very fine.” This black can also be made with almond shells or other stone-fruits.
I started by putting the cleaned and dried peach pits into an empty, clean can. I put an aluminum foil cap on the can in order to keep the peach pits clear of ash and other coals. I then placed the can into a fire with plenty of coals. The aluminum foil disintegrated in the heat and fell into the can. When the fire had died down, I pulled the can out and allowed it to cool.
I was very happy with how well the peach pits carbonized without disintegrating. I put the peach pits into my mortar and crushed them until they were a fine powder. I had to be careful to keep a hand over the top of the mortar as I crushed the peach pits because pieces wanted to fly out. The resulting fine powder made a lovely deep black when made into paint.